Using AI in Laravel with Replicate
In this post I would like to show you how easy it is to use open source models through the Replicate API in a Laravel application.
Setup Replicate
Replicate is an online service that let you run open source AI models through an easy API.
To use Replicate you need to create an account on www.replicate.com and generate an API key. The first few days are free without any billing setup. After this you will receive a prompt to setup your billing details.
Setup the project
To start we have to create a fresh Laravel project composer create-project laravel/laravel ai-laravel (ai-laravel is the project name).
Now that Laravel is up and running we need to access the Replicate api. Luckily someone already made a package to access the Replicate api easily through PHP. Require the following package composer require benbjurstrom/replicate-php.
After installing the package we can add Replicate to our services config file. Open config/services.php and add the following lines:
'replicate' => [
    'api_key' => env('REPLICATE_API_KEY')
],
and add the REPLICATE_API_KEY to your .env file with key value:
REPLICATE_API_KEY="your_api_key"
Next we should setup the new package so we are able to use it easily within other files through dependency injection. This can be done by opening our app/Providers/AppServiceProvider.php file and bind the package to the container.
Insert the following code inside the boot method:
public function boot(): void
{
    $this->app->singleton(Replicate::class, function () {
        return new Replicate(apiToken: config('services.replicate.api_key'));
    });
}
Now everytime we access the Replicate class through dependency injection we are sure the object is constructed with our api key. We also use a singleton here since the instance can be the same everytime.
Building an AI service class
To start of we need to build a service class that uses the Replicate API and can be used in files like commands and controllers. Create a new file inside app/Services/ called AIPhoto.php.
<?php

namespace App\Services;

class AIPhoto
{
    public function __construct(public Replicate $api)
    {
        //
    }

    public function render(string $prompt): string
    {
        // todo
    }

    public function output(string $id): ?string
    {
        $response = $this->api->predictions()->get($id);

        return $response?->output[0] ?? null;
    }
}
This is the start of our service class and now we need to use the correct model from Replicate to start rendering our AI photo. The model we are using in this tutorial is zsxkib/instant-id. This model can create stunning images from a single photo.
The examples on the project page are not done through PHP but can easily be convert to PHP. The Replicate package uses a function called predictions create $this->api->predictions()->create(VERSION, INPUT). This function will start the render process on the Replicate servers and needs a model version and input to work with. Lets update our render method with the correct code. Don't worry about the model input values.
public function render(string $prompt): string
{
        $version = '6af8583c541261472e92155d87bba80d5ad98461665802f2ba196ac099aaedc9';
        $input = [
            'model' => 'zsxkib/instant',
            'image' => 'https://images.pexels.com/photos/614810/pexels-photo-614810.jpeg',
            'width' => 640,
            'height' => 640,
            'prompt' => $prompt,
            'scheduler' => 'EulerDiscreteScheduler',
            'enable_lcm' => false,
            'sdxl_weights' => 'protovision-xl-high-fidel',
            'pose_strength' => 0.4,
            'canny_strength' => 0.3,
            'depth_strength' => 0.5,
            'guidance_scale' => 5,
            'negative_prompt' => '(lowres, low quality, worst quality:1.2), (text:1.2), watermark, painting, drawing, illustration, glitch, deformed, mutated, cross-eyed, ugly, disfigured (lowres, low quality, worst quality:1.2), (text:1.2), watermark, painting, drawing, illustration, glitch,deformed, mutated, cross-eyed, ugly, disfigured',
            'ip_adapter_scale' => 0.8,
            'lcm_guidance_scale' => 1.5,
            'num_inference_steps' => 30,
        ];

        $response = $this->api->predictions()->create($version, $input);

        return $response->id;
}
The code is little bit different from the examples shown on the Replicate model page. We need to extract the version from the model name and add the model name to the input. This is the same for every model used on Replicate.
After this is done we tell Replicate to start rendering our image. This will return an ID that needs to be rememberd. You can also view the rendering and output in your Dashboard on the Replicate website. It will take some time to render the photo, around 20 seconds.
Try out the service class
Now its time to try this service class in the Tinker command line from Laravel. Open up the terminal and run php artisan tinker. This will put you inside the booted application. Now run our service:
$id = resolve(App\Services\AIPhoto::class)->render('Astronait, Mars, Space');
Wait a minute to make sure Replicate is done rendering our photo (or check the status inside the dashboard of Replicate) and get the output of the photo.
$output = resolve(App\Services\AIPhoto::class)->output($id);
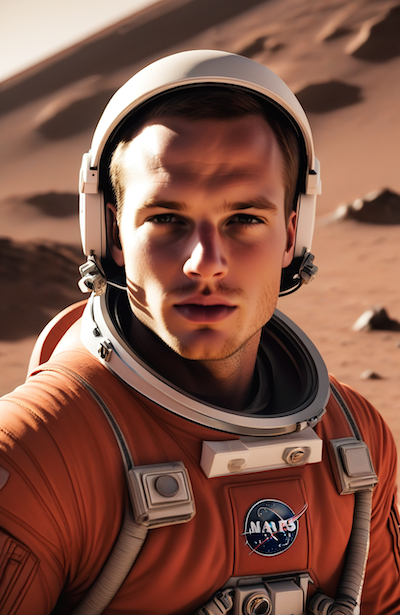
Open the url that is returned inside your browser. In my case the render looks like this (I did use my own photo).
Wrapping up
In this example we used the service class inside Tinker. You can also use this class inside a controller or a Livewire component to render AI generated photo's. You could create a file upload field where users can upload photo, write a prompt and generate an image.
You can also check out other models and try them out though the same principle. The only thing you need to change is the version and input of the render method. The cost of rendering images is also very low for the models I tried so far. Around 1 to 2 dollar cent per generated image.
In the next part we take a look at using this in combination with a Livewire UI.